みなさんこんにちは、 id:takkumattsu です!
前回flutterでFirebase App Distributionを利用してアプリを配布する - covelline blogという記事を書いたのですが、その時の宿題として flavor を分けるというのがあったので今回はそのやり方を書いていきたいと思います!
余談ですが現在開発しているカスタマイズ自由なニュースアプリ fennec は flutter でバリバリ開発しています🦊
【ベータテスター募集中】
— fennec_app (@fennec_app) 2021年3月23日
コベリンの新しいニュースアプリの開発に協力してくれませんか?
タブをカスタマイズして自分専用のニュースを作ってみましょう!
iOSはこちら👇https://t.co/lSdAGAb0Qy
Androidはこちら👇https://t.co/ysla62UWLV pic.twitter.com/QvsQCC6oQq
是非インストールして使ってみてください!
前置きが長くなってしまいましたがさっそく書いていきます!
初めに
Development、Staging、Productionの3つのflavorを追加することを例に書いていきたいと思います。
コードは https://github.com/takkumattsu/add_flavor_flutter に置いてあります。
flavor を分ける
iOSの flavor(schema) 追加
まず Xcode で open ios/Runner.xcworkspace/ を開きます。
open ios/Runner.xcworkspace/
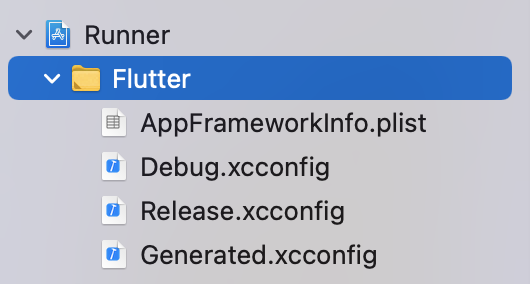
XXX.xconfigを作る
Development.xcconfig、Staging.xcconfig、Production.xcconfigとなるように変更します。
中身はひとまず
#include "Generated.xcconfig"


PRODUCT_BUNDLE_IDENTIFIER=
BUNDLE_NAME=
とします。
| before | after |
|---|---|
 |
 |
Configurationsを修正する
DebugとReleaseを用意しておきます。
Developmentは開発時にしか使わないのでDebugだけにしています。

Schemeを修正する
Edit Schemeから

元からあるやつをコピーして(Duplicate Scheme)、RunのBuild ConfigurationをDebug-XXXXXに変更します。

ProfileとArchiveはRelease-XXXXXに変更します。

最終的にこんな感じに

表示名とBundle Identifierを変える
XXX.xcconfigを自分のアプリに合わせたものに変えます。
例)
Production.xcconfig
#include "Generated.xcconfig"

PRODUCT_BUNDLE_IDENTIFIER=com.covelline.xxxapp
BUNDLE_NAME=APP
Development.xcconfig
#include "Generated.xcconfig"

PRODUCT_BUNDLE_IDENTIFIER=com.covelline.xxxapp.dev
BUNDLE_NAME=DEV APP
Staging.xcconfig
#include "Generated.xcconfig"

PRODUCT_BUNDLE_IDENTIFIER=com.covelline.xxxapp.stg
BUNDLE_NAME=STG APP
その後にProduct Bundle Identifierに$(PRODUCT_BUNDLE_IDENTIFIER)を入力します。
| before | after |
|---|---|
 |
 |
表示名を変えるにはInfo.plistのBundle nameを$(BUNDLE_NAME)に変更します。
| before | after |
|---|---|
 |
 |
実行してみる
iOSのシミュレーターを起動して以下で実行できます
flutter run --debug --flavor Development
表示名も変わってますね!

Android の floavr 追加
application idの変更
android/app/build.gradle に以下を追加します。
diff --git a/android/app/build.gradle b/android/app/build.gradle
index ca7280b..fa1126e 100644
--- a/android/app/build.gradle
+++ b/android/app/build.gradle
@@ -34,7 +34,7 @@ android {

     defaultConfig {
         // TODO: Specify your own unique Application ID (https://developer.android.com/studio/build/application-id.html).
-        applicationId "com.example.add_flavor_flutter"
+        applicationId "com.covelline.xxxapp"
         minSdkVersion 16
         targetSdkVersion 30
         versionCode flutterVersionCode.toInteger()
@@ -48,6 +48,19 @@ android {
             signingConfig signingConfigs.debug
         }
     }
+
+    flavorDimensions "default"
+
+    productFlavors {
+        production {
+        }
+        development {
+            applicationIdSuffix ".dev"
+        }
+        staging {
+            applicationIdSuffix ".stg"
+        }
+    }
 }
表示名の変更
android/app/src/main/AndroidManifest.xml を以下のように変更します。
diff --git a/android/app/src/main/AndroidManifest.xml b/android/app/src/main/AndroidManifest.xml
index 7976cb9..77db055 100644
--- a/android/app/src/main/AndroidManifest.xml
+++ b/android/app/src/main/AndroidManifest.xml
@@ -1,7 +1,7 @@
 <manifest xmlns:android="http://schemas.android.com/apk/res/android"
     package="com.example.add_flavor_flutter">
    <application
-        android:label="add_flavor_flutter"
+        android:label="@string/app_name"
         android:icon="@mipmap/ic_launcher">
         <activity
             android:name=".MainActivity"
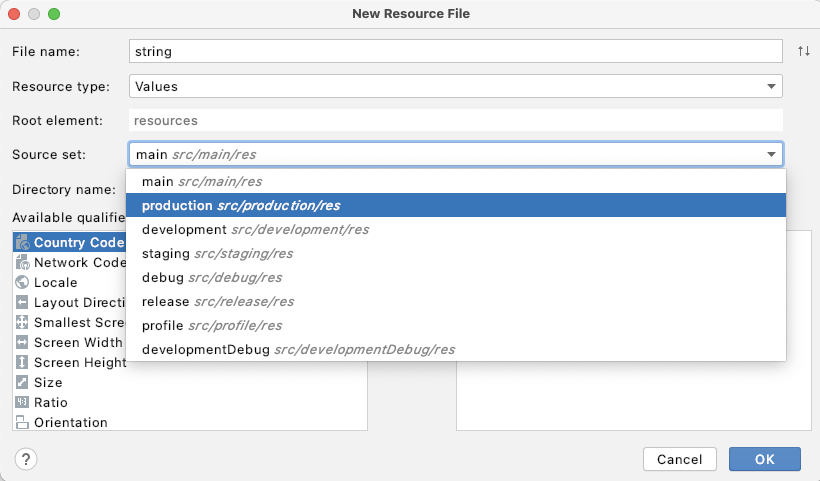
次に以下のルールでstrings.xmlを作成します。
android/app/src/falvor/res/values/string.xml


中身はapp_nameを定義します
<?xml version="1.0" encoding="utf-8"?>
<resources>
    <string name="app_name">STG APP</string>
</resources>
実行してみる
Androidのエミューレーターを起動して
flutter run --debug --flavor Development
表示名も変わってますね!

終わりに
一回やり方がわかってしまえば簡単ですね! 良いflutterライフを!